Home Network Overhaul
Read about how I overhauled our home network using Unifi/Ubiquiti gear, a Brocade ICX switch, and PFSense.
For the longest time our home network had been running using a single "do-it-all" consumer router, wifi, and switch device like just about every other household in the world. Overall it did a pretty good job, but being the nerd that I am, it left me wanting more control over our network. It simply didn't support some of the more advanced networking tools like VLANs, multiple wifi SSIDs, or bandwitdh throttling. I also wanted to get some PoE security cameras for our home, which our router simply wouldn't power. So, it was time to start researching!
Ubiquiti
Ubiquiti has been around a long time, and make great "prosumer" grade network hardware. I knew I wanted to go with their Wifi access points and security cameras, because it has a slick user interface and their cameras record directly to a device locally (yay for owning your data!). I ended up aquiring a CloudKey Gen2+, U6 Pro Wifi AP, AP HD Lite, and 2 G5 Bullet security cameras from various sources.
As far as the other pieces of the network like server rack, PoE switch, router, and gateway, I would happen to luck out on a monster OfferUp find shortly after beginning my search...
OfferUp for the win 💰💰💰
I have a very frugal mindset and am always trying to get things for the best deal possible. Facebook Marketplace, Craigslist, and OfferUp take the place of Amazon for me, and I'm always keeping my eyes peeled on these platforms for secondhand deals on things that I want to purchase. So for me, this was a natrual place to start for piecing together our new network stack.
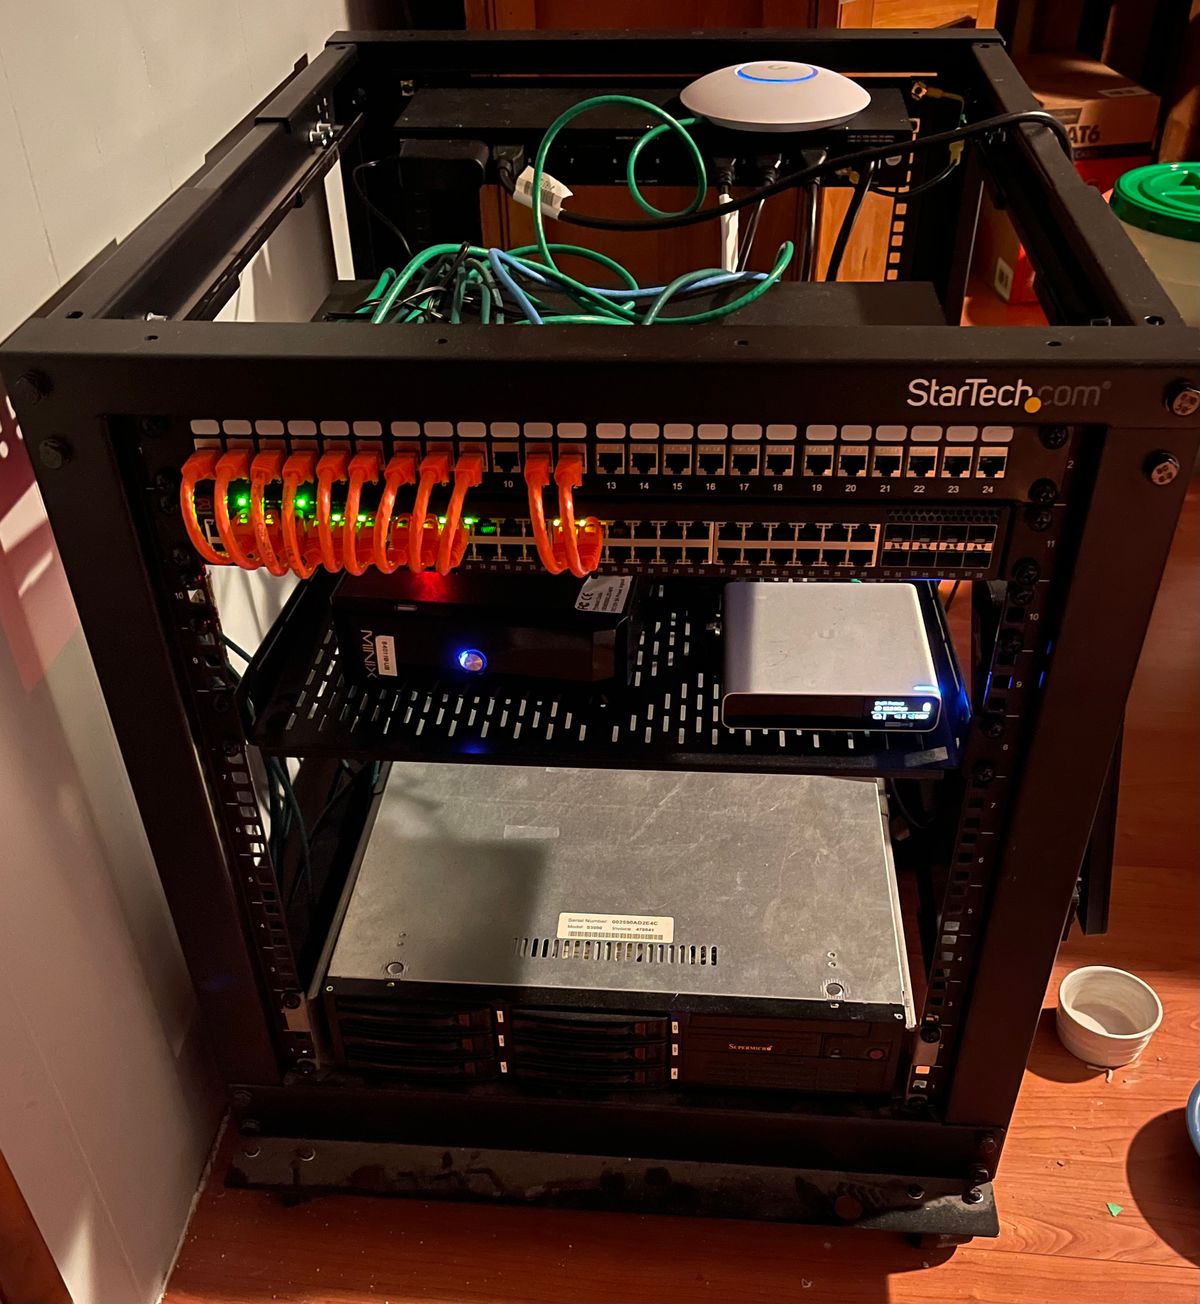
I happened upon a post on OfferUp for some used networking equipment from a business who was getting rid of some unused equipment up in Battle Ground Washington, a 45 minute drive from my home. This included a 12U server rack, 48 port PoE switch (Brocade ICX 7250-48p), a crap ton of ethernet cables + patch panels, and a mini PC with 2 NICs onboard for running PFSense. All for ~$200! 🍻
Putting it all Together
Now that I had all of the hardware, the real fun was about to begin, in running network cables, configuring the switch + router, and segregating the network.
Running Ethernet Cables
Turns out running cables through an existing home can be a challenge. I wanted to have all of the ethernet runs terminate in our basement, which meant running cables through the attic, down an interior wall (access via closet), through the first floor, and down to the basement. A few holes in walls (thankfully unseen and inside closets), and a small hole drilled through our floor later... 😬 The cables were finally where they needed to be.
Network Design
One big goal for this project was to lock down different zones in the network, so things like IoT devices couldn't reach out to my servers, and guest devices could only access the internet. This is a perfect use case for VLANs, so away I went in configuring 5 separate VLANs on the network:
| VLAN ID | Purpose |
|---|---|
| 2 | Transit (traffic from Brocade switch to PFSense) |
| 3 | Management |
| 10 | Clients (access to everything) |
| 20 | IoT Devices (internet + mDNS only) |
| 30 | Guests (internet only) |
| 40 | Security Cameras |
| 50 | Servers |
Initially, the Brocade switch did all the layer 3 routing between VLANs. However, as I'll share below, ACLs turned out to be a huge pain to work with. So, I later pivoted to having PFSense do the routing which simplified things a ton.
Brocade ICX 7250-48p
Creating a serial cable
The Brocade ICX line of switches doesn't use a standard serial port for console access, but instead it hacks a mini USB port to act as a serial port. This is decieving because one would intuitively think to just try connecting up the switch from a USB port on your computer to the mini USB port on the switch, but this simply doesn't work.
TL;DR: This Reddit post helped immensely in hacking together my own serial cable from an RJ45 keystone jack, a mini USB cable, and a standard Cisco console cable.
PiHole

I knew I wanted to use PiHole running on one of my Raspberry Pis for DNS, but what I didn't know was that PiHole also can serve as a DHCP server. This was necessary becauase (as pointed out earlier), I needed to create a dedicated transit network for traffic flowing from the L3 switch up to the PFSense router, and using this configuration PFSense can't serve DHCP for multiple VLANs (lame). This is because PFSense binds each DHCP pool to a single interface, and you can't serve multiple different pools in a single interface (in my case was the LAN interface).
PiHole doesn't have a "supported" way of serving DHCP for multiple VLANs in the GUI, but under the hood is using dnsmasq, which does support this. So, I created a new dnsmasq config file to house all my config changes for the VLANs within my network.
Something that took me far too long to debug was getting PiHole to work after moving it into the management VLAN. Turns out the default for PiHole is to deny queries from anything that's more than 1 hop away for security purposes. I was able to ping my PiHole machine (in a different VLAN than my client), but not perform any DNS queries. This ends up working in single subnet environments, but not in a VLAN setup like the one I was creating. In Settings > DNS > Interface Settings, you can change this behavior to allow any origin, which is what I had to change. That was fun!
Creating an access list for a guest network
Props to this site for tne inspiration on creating an access list for a guest network.
ACL Logging
To enable ACL logging on an ICX switch, the following is required:
- Add "log" to the end of desired deny entries
- Enable logging for the ACL by running logging-enable under the access list config
- Enable ACL logging in the VLAN by running
vlan 20 ip access-group vlan20 in logging enable - To view the logs, run
sh log
Avahi to get Casting to Work Across VLANs

After getting everything set up I realized quickly that the VLAN segregation had broken our Chromecast devices. After some research, I learned this is due to multicast traffic not being sent across VLANs.
Multicast is the communication type that systems like chromcast uses to discover devices that can be cast to. Some switches, like Unifi switches, have naitive support for mDNS (multicast DNS) naitively. Unofortunately, the Brocade switch doesn't have a built-in multicast gateway functionality (at least not that I could easily find!). Thankfully, PFSense supports a service called Avahi, which acts as a multicast/Bonjour broker which can proxy multicast requests between networks.
So, to get this working I just had to assign interfaces to VLANs on my PFSense box, and trunk these VLANs over from the Brocade switch, giving this multicast traffic a way to get between VLANs. Once this was configured, casting "just worked"!
Switching from ACLs to Firewall management
ACLs are a pain to work with (at least for a networking novice like myself). So, after much thought and research, I decided to shift VLAN gateways to the PFSense router rather than doing the routing at the switch. While this technically does have a performance hit, the ease of VLAN segregation and rule configuration at the firewall level ended up being a huge upside and made the switch worth it 💯.
Final Thoughts
Overall, I'm very happy with our the network overhaul went. Everything with the network is rock solid, blazing fast, and more secure than ever. However, half of the fun of technology projects is knowing it's never truly "done", so as I continue to learn and add to the network, I'll post updates to the blog and share what's new!